|
Drawing Structures with ChemSketch
It is amazing that ChemSketch is freeware because it is a quite powerful chemical structure drawing program. One of its few drawbacks is that it is somewhat complicated to learn. However, if you have any experience with drawing programs then some aspects of it should be easier for you to learn.
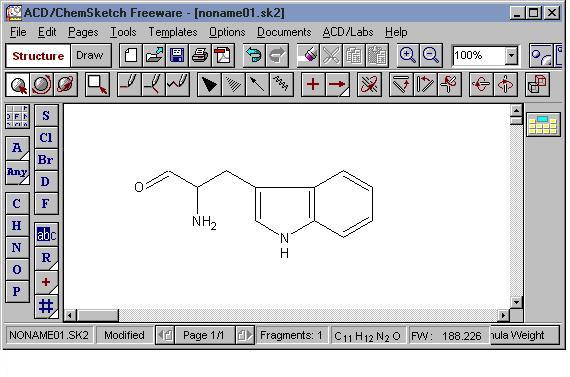
Introduction
- Help | Help Topics | Contents tab | ChemSketch | Structure Mode | Structure Mode screen Click through (!) these choices. Finally, you'll see an interactive screen for Structure mode. Whenever you click on some part of the screen picture, you get help on that particular part. Keep the Help window open while you learn. You can get the same interactive help for Drawing mode.
- Set General Preferences [Options | Preferences]
Modes
Chemsketch has two modes: Structure and Draw. There are similarities and differences between them. Generally, the Structure mode generates structural parts of the file such as atoms and bonds and the Draw mode allows you to enhance them with arrows, boxes, and non-structure drawings. In both modes, there are drop down dialog boxes and panels in which you make stylistic choices among different fonts, line widths, etc.
As you explore the toolbar buttons, point to a button and in a moment a tool tip will appear. This is one of the best ways to learn the tools buttons and their functions.
When you are using Help, open the window on Mouse Commands. Each tool seems to behave slightly differently depending on whether you single or double-click, drag, etc. It is good to be aware of the possibilities.
Tools
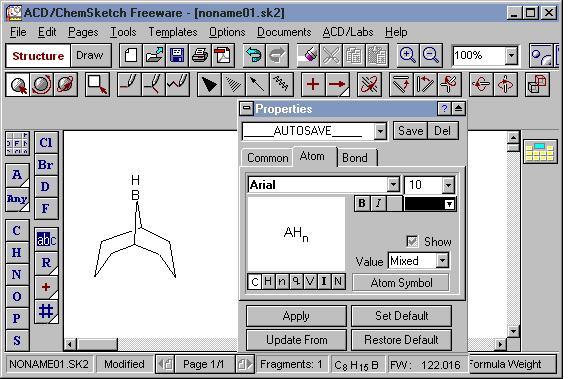
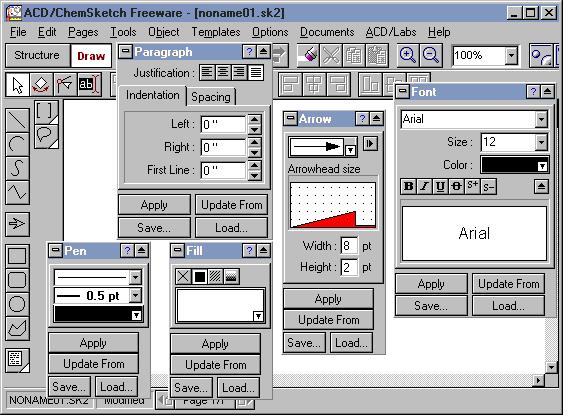
The two images below show the Structure and Drawing Modes windows. In addition to the buttons in both modes, there are tool panels that apply formatting to your structure and drawing. Access the panels from the Tools menu in both modes.
Tools | Structure Properties in Structure mode
The Structure Properties panel is open. The panel can be moved anywhere, on or off the main window. The two most commonly used tabs are "Common" and "Atom".
Tools | Panels in Drawing Mode
The panels that are open in the Draw Mode pertain mostly to text formatting (Font, Pen, Paragraph) and drawing (Arrow, Fill).
I. Chemical Structures
Drawing structures -- The best way to learn how to draw with ChemSketch is to start copying examples you see in books. There are some suggestions below you can copy for practice.
Use the Clean Structure tool to fix your drawing (or sometimes it messes it up). There are multiple levels of "undo".
II. Drawing Tools and Objects
Drawing -- Some of the tools here are more obvious in how they are used, but they are also of less chemical importance. Again, practice copying examples.
You'll find that your drawings are much easier to manipulate if you learn about Grouping and Ungrouping objects in Draw mode.
III. Templates
A great help and a strong feature of ChemSketch are the Templates, that contain pre-drawn structures and figures. Access the various templates from the drop-down menu or from the tool bars at the top and right side of the Structure Mode window.
The Table of Radicals contains the commonly drawn monocyclic rings and small substituent and functional groups as well as amino acids. The Template Window and Organizer is an extensive collection of structures and drawings organized by type, such as sugars, steroids, etc. When you open the Template Window, there is a menu of collections on the left, but clicking on the drop-down box will reveal many more. You can choose your own short-cut menu in the Organizer.
Open the Templates Window and the Organizer to see what is available. You might start by exploring and checking these topics in the Template Window:
- orbitals;
- reaction symbols (including electrons);
- non-bonding and bonding electron pairs (Lewis structures)
- stereo templates;
- monocyclic alkanes;
- rings; and
- lab figures.
Make sure you notice the little icon that indicates more than one page for many of these templates.
IV. Extra Features
Check out these Tools:
- Check tautomeric forms
- Generate name from structure
- Mass spec scissors
- Calculate properties
- Search PubChem and eMolecules
V. Saving Files as Images
Importing and Exporting-- ChemSketch can open (Import) files in the Window Metafiles (wmf) format, as well as two others you'll become familiar with, the MDL .mol files used by DS Visualizer and the ChemDraw .chm files. ChemSketch can save (Export) to these same formats as well as to bmp and gif files. When you export to gif format, for example, from a ChemSketch document that has multiple pages, only the page on view (or the selected portion) is saved as a graphic. Each page in CS must be saved separately.
You can copy a structure (and other objects) and paste it in another application such as Word or Excel. (What is the difference between the ways in which a structure and text are edited in Word after pasting?)
If you copy the image to Paint, or other graphics program, you can then save the file in the .gif format.
You can copy from other applications and paste into ChemSketch.
If you want to open the 3-D file in another molecular viewer, save the file as an MDL .mol file.
VI. Embedding ChemSketch drawings in Windows applications
MS Office 2007 does not support OLE with ChemSketch to the same extent it does among the Office applications (read the Object Linking and Embedding document). The last section of the documentincludes instructions on embedding ChemSketch drawings into Office 2007 apps. OLE is the next topic in the course.
1. Reproduce the structures shown in the Practice pages linked below. Drawing each of the practice structures will help you learn some of the features of ChemSketch, e.g. drawing rings from the template menu, changing atom symbols, drawing carbon chains, etc. If you need to know how to do something, open Help.
2. Many times you will have to expand a collapsed structural formula and show the correct sterochemistry and geometry. This would be a good time to review hybridization, geometry, bond angles, non-bonding electrons, formal charges, etc.
Here are a few examples, with answers.
- Show
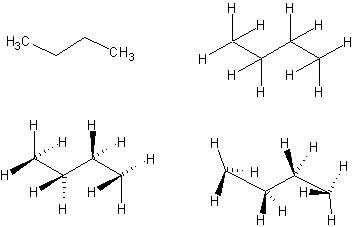
an expanded zig-zag structure for n-butane.
- Draw
a structure for acetaldehyde in its most stable conformation (C-H eclipsing
C=O). Show the localized p orbitals of the carbonyl group.
- Expand
all the structures for the reaction SO2 + PCl5 --> SOCl2 + POCl
Be sure to show the correct geometry and non-bonding electrons (except for Cl) for each.
3. Read the OLE and OLE Limitations documents mentioned above, after they have been assigned in class.
Select a ChemSketch object in the ChemSketch window. Copy it. Embed it into a Word page using Paste and then Paste Special.... Double-click the object. Is there any difference between the two methods? Can you Link the ChemSketch object?
Choose Insert | Object in Word. Choose Create New ACD ChemSketch object. Draw an object and finish embedding in Word. What do you do if you choose Create From File? Can you Link the file?
4. Insert an equation into a ChemSketch document using Equation Editor.
5. Can you embed a Word document inside a ChemSketch document? An Excel spreadsheet? If you can embed these objects, and you want to edit them, do you need to be in the Structure or Draw modes, or either?
Simplified Molecular Input Line Entry Specification
http://www.daylight.com/smiles/
SMILES is widely used as a general-purpose chemical nomenclature and data exchange format. The "character string" (the sequence of ASCII characters) represents a structrual model of a molecule. The string can be read by both humans and computers -- computers cannot typically read the two- and three-dimensional structures generated by chemists.
Atoms
An individual element is represented by a standard atomic symbol. It is required to be present for each atom, except Hydrogen.
Elements and charged species are written within brackets.
examples:
[B] element boron
[OH3+] hydronium ion
Elements in the following "organic subset" typically have well-defined valences and may be written without brackets if the number of attached hydrogens conforms to the lowest normal valence consistent with explicit bonds. This subset, and their lowest normal valences, are:
B(3), C(4), N(3,5), O(2), P(3,5), S(2,4,6), F(1), Cl(1), Br(1), I(1).
examples:
C methane
N ammonia
Bonds
Single, double and triple bonds are represented by the symbols `-', `=' and `#', respectively. Alternatively, sp2-hybridized atoms may be represented in lower case. Single bonds may be omitted. If an atom is enclosed in brackets, all explicit Hydrogens must be shown, as in the last example for ethane, below.
examples:
CC ethane
or
C-C
or
[CH3]-[CH3]
C=CC=C butadiene
or
cccc
CC#C propyne
Branches
Branches are specified by enclosing them in parentheses, and can be nested or stacked. The connection to a parenthesized branch is to the left.
CC(C)C(=O)OC methyl isobutyrate
CCN(CC)CC triethylamine
Rings
examples:
C1CCCC1 cyclopentane
CC1CCC1 methylcyclobutane
c1ccccc1 benzene
Geometric Isomerism
examples:
F/C=C/F trans-1,2-difluoroethene
or
F\C=C\F
F\C=C/F cis-1,2-difluoroethene
or
F/C=C\F
SSMILES is an extremely simplified subset of SMILES used for expressing "normal" organic chemicals, i.e., neutral molecules with atoms at their normal organic valences. There is no need for brackets, charges, aromatic specifications, etc. In fact the rules for the language are basically:
- Atoms are represented by atomic symbols
- Double bonds are `=', triple bonds are `#'
- Branching is indicated by parentheses
- Ring closures are indicated by pairs of matching digits.
Which is pretty much what you see above.
Practice with easy structures by drawing them in ChemSketch and then generating the SMILES notation.
Here are a few examples.
ChemSketch is not only a molecular drawing program, it is also a molecular visualization program. You can toggle back and forth between the two programs.
I. To switch to the 3D window from the ChemSketch window:
- click the [3D] button at the bottom of the window, or
- draw a structure and click the [Copy to 3D] button at the bottom of the window, or
- if
you don't see either of the 3D buttons, choose ACD/Labs
| 3D Viewer from the menu bar.
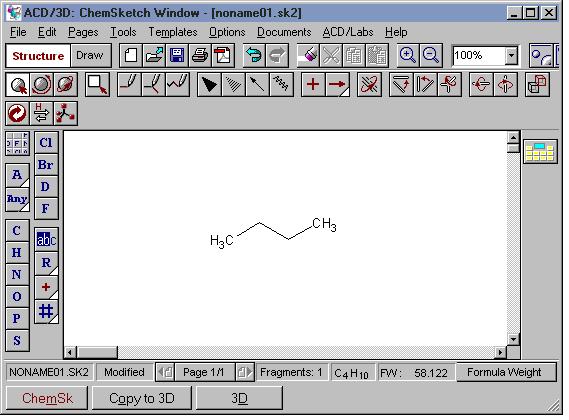
A good procedure for visualizing a molecule in 3D while preserving your drawing in the sketch pad is to first draw the molecule in Structure mode, then press the [Copy to 3D] button. The view switches to 3D and the molecule appears in the window. It is still a 2D object, however. From the 3D menu, choose Tools | 3D Optimization or click the 3D Optimization tool button.
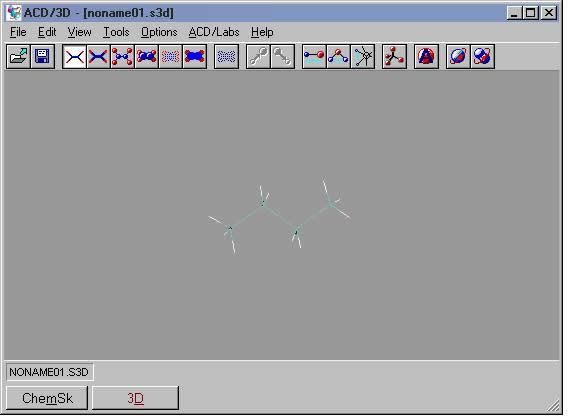
In the example shown here for butane, the program adds the hydrogens and adjusts the bond angles. If you rotate the molecule, you can see the anti staggered arrangement of the C-H bonds. The program has adjusted the geometry of the 2D sketch to the lowest energy molecular conformation (anti staggered).
Practice: Place a cyclohexane chair structure from the Templates window into the ChemSketch window. Repeat the process described for butane, above. Be sure to rotate the optimized cyclohexane structure in the 3D window. What conformation is this?
Review the conformational analysis of alkanes (dihedral angle; staggered/eclipsed; anti/gauche) and cyclohexane (chair conformations, axial/equatorial bonds).You can 3D-optimize your drawing in the sketch window before copying to 3D. However, you lose your original drawing in the sketch pad. Make a copy before optimizing, and optimize only one of the structures.
II. 3D Display
The molecular image can be rendered in line, stick, ball & stick, or spacefill modes. Toggle among them by right-clicking, or by pressing one of the toolbar buttons or choose View on the menu bar.
To rotate the molecule, hold down the left mouse button and drag the molecule around the x, y, and z axes. To more precisely position the molecule around the x and y axes, press the up/down/left/right arrow keys.
III. Measurements
You can measure bond lengths, bond angles, and torsion angles for any molecule.
Click one of the measurement tool buttons. Then select the correct number of atoms in the molecule (length - 2; bond angle - 3; torsion angle - 4). A pop-up window shows the measurement.
Confirm the approximate bond angles from the hybridization predictions in the Practice Problems posed above.
IV. Saving Files as Images
You can copy the 3D image and Paste or Paste Special into another Windows application. The background color is also copied and so you might want to change it from the default black to white. (You could also paste the image in Paint and change the background there.)
If you paste it to Paint, or other graphics program, save the bitmap as a .jpg image. You can then use the image in a web page.
1. Use the continuous chain tool and the "C" atom button to draw a zig-zag with 4 carbons. Then choose Tools | Add Explicit Hydrogens to sprout hydrogens at each of the carbons (or on selected carbons).
Use the stereobond tools. Use the "Lasso" tool to move the C's and H's around so they look like they are in the front and back of the zig-zag. All the carbons are sp3-hybridized, tetrahedral geometry, ~109 deg. bond angles.
2. Draw
acetaldehyde. Make stereobonds. Add non-bonding electrons (Template
| Organizer | Reaction
symbols). Press ^G to group the electrons with the molecule. Add orbitals
(Template | Organizer
| Orbitals). In Draw mode,
use text tool to add C and O atom labels and use the line tool to add
bonds. Group all segments. The carbonyl carbon is sp2-hybridized, trigonal
planar geometry, ~120 deg. bond angles. The methyl carbon is sp3-hybridized,
tetrahedral geometry, ~109 deg. bond angles.

3. Notice
particularly the effect of the non-bonding pair of electrons on the geometry
of the sulfur dioxide molecule (compare with linear CO2; the carbon is
sp-hybridized, linear geometry, 180 deg. bond angle). What geometry is
exhibited by PCl5? Review VSEPR theory for atoms with 5 or 6 single
bonds.

